
Which Power Query user are you?
Our objective for today is to discover how to programmatically create functions and re-use them in our queries.
As you will appreciate, and follow with the blog content, we will almost not be using the ribbon to transform our data, but use different blocks of code to achieve the results.
The 4 cases presented in the blog are:
- Case 0: my first function
- Case 1: including a function in the data load (slide + code excerpt)
- Case 2: using a function previously created
- Case 3: use parameters to invoke functions against a table and column of our choice
Case 0: my first function
Creating Function1 from a blank query:
let

// function follows "=>" go-to symbol
Source = (x) =>
(x * 3.2)

in

Source
Look how function shows in user interface:
Once this function highlighted with the pointer, you can Invoke it:
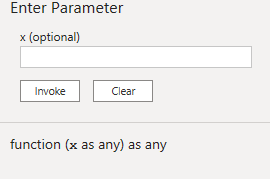
In this first example, as reflected in the left pane, function outputs a scalar value:

Power Query: Function1 invoked received parameter 10
That is great, my guess is you are interested in seeing how functions and tables do work in Power Query.
Case 1: but I am working with tables, not scalars!
This short introduction to functions was necessary before seeing how to create a conditional function and invoke it inside a table function:


As in case 0, the function is encapsulated inside “let in” query block.
The difference this time is we invoke the function immediately after declaring it.
In the interface, we will not see any function icon on the left pane: the function is part of the query.
let
// Defining our custom function

    FnAdjust =
        (q) =>
        if q > 55 then
        q * 3.3333
    else q ,

// Demo table previously loaded, custom function invoked inside table.TransformColumns
Source = Demo,
AdjustedColumn = Table.TransformColumns (
    Source ,
    {{ "SalesQuantity" , FnAdjust , type number }}
        // above function applies to SalesQuantity column
        // below apply on 2 columns
        // {{ "SalesQuantity" , FnAdjust , type number }, { "SalesAmount" , FnAdjust , type number }}
)

in
AdjustedColumn
To help you reviewing the code, this sequence goes like:
- Declare function
- Load data
- Apply function to every row in “SalesQuantity” column. “{{ }}” marks a nested list.
- Return transformed table
Case 2: calling an existing function in a blank query
As seen in Case 0, we are not forced to declare a function inside a “let in” statement that contains a source table.
For this, you simply need to create the function, name it accordingly in the right “Properties” pane and finally invoke it against another query.
Separating your functions from the query output can be a time saver, if your aim is to limit clicks and steps applied.
Of course, to achieve this result, we must concentrate on M programming instead of clicking and adding steps from the user interface.
let
// _FnAdjust function is created separately
    Source = Demo,
    Step1 = Table.AddColumn ( Source, "ColumnCreated", each _FnAdjust ( [SalesAmount] ) )
in
    Step1
In below example, I added a check to obtain null on “ColumnCreated” to handle missing or misspelled columns:
let
Source = Demo,
    Step1 = Table.AddColumn ( Source, "ColumnCreated",
    each if Record.HasFields(_, "TotalCost")
    then _FnAdjust( [TotalCost] )
    else null
    )
in Step1
If you pay attention to details, case 2 leverages Table.AddColumn, whereas case 1 leverages Table.TransformColumns.
If the difference between the two tables functions is explicit, my aim is to point out the flexibility provided by this approach.
If you read the blog until there, you already learned 2 table functions and maybe, you identify an incredible set of possibilities provided by custom functions.
Case 3: “sort of” parametrize functions
I will terminate this blog with a workaround used to select tables – columns and functions via parameters.
As Power Query apparently does not allow to parameterize custom functions (no functions in those nice user interface boxes, see case 0), a solution to this limit consists in mapping a name to our functions and use this name in a paramter.
The code is a bit elaborated and again, relies on “if then else” statements to handle error checks.
Most importantly we have 2 “let in” statements: one for the outer scope GetAllColumns and another one for the innerscope containing Fname mapping, column exist and apply selected.
let
    // Define function with a selector and column name
    GetAllColumns = (InputTable as table, ColumnName as text, FName as text) as table =>
    let
        // Map FName to function
        OperationFunction = if FName = "FunctionA" then
            (q as nullable number) as nullable number =>
                if q <> null and q > 55 then q * 3.3333 else q
        else if FName = "FunctionB" then
            (q as nullable number) as nullable number =>
                if q <> null and q > 55 then q / 3.3333 else q
        else
            error "Invalid operation name. Please choose 'FunctionA' or 'FunctionB'.",

        // Column exist check in input table
        HasColumn = List.Contains(Table.ColumnNames(InputTable), ColumnName),

        // Apply selected function to column if exists
        OutputTable = if HasColumn then
            Table.TransformColumns(
                InputTable,
                {{ColumnName, each OperationFunction(_), type number}}
            )
        else
            error "Column '" & ColumnName & "' does not exist in the input table."
    in
        OutputTable
in
    GetAllColumns
The editor now displays a drop-down menu to select a table and 2 text boxes to fill in manually “ColumnName” and “FName”.
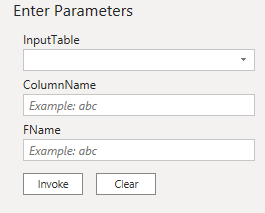
Once the functions are invoked, you are totally free to modify their parameters from the Source step which is extremely flexible:

Power Query: parameters showed on the Source step of an invoked function
Whether you are long time user or just getting started, just try to code your own functions, you will not regret it.
Let me wrap up with a short list of the advantages provided by custom functions in Power Query:
- re-usability: 1 custom function can be re-used across queries (see Case 2)
- clearer code as limits the number of applied steps (see Case 3)
- performance enhanced as help avoiding re-calculations
Hope you enjoyed the content!

Leave a comment